Seattle rain garden landscaping: A four-step drainage plan
Seattle receives roughly 37 inches of precipitation in an average year, but the annual total is less useful than the delivery pattern. Water arrives in concentrated winter events.
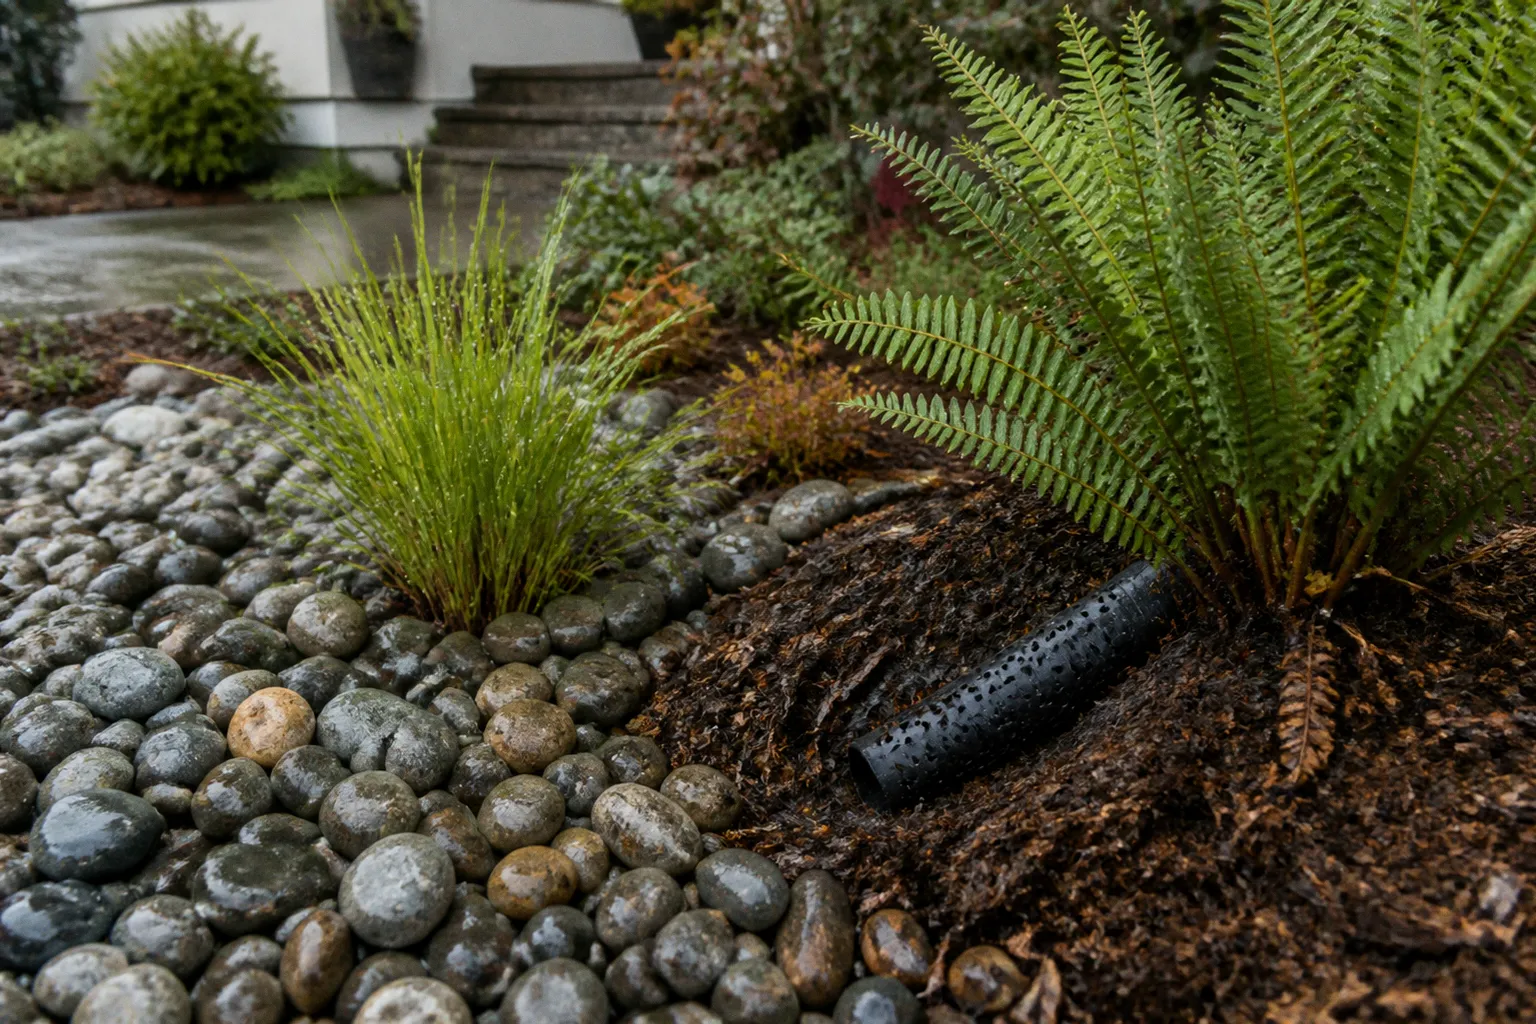
Roofs, driveways, patios, and compacted lawns move that runoff toward streets and storm drains faster than the soil can absorb it. The result is familiar: standing water near foundations, saturated planting strips, erosion, and unnecessary load on local drainage systems.
A rain garden is a controlled response. It is a shallow landscaped depression that receives runoff, holds it temporarily, filters it through engineered soil, and allows it to infiltrate gradually. The installation is not a decorative pond. It is a small piece of stormwater infrastructure with defined setbacks, soil ratios, drainage limits, and planting zones.
A workable Seattle rain garden landscaping plan follows four steps:
1. Locate and size the garden.
2. Excavate and build the soil system, including inflow and overflow.
3. Plant according to moisture zones.
4. Maintain the system and verify whether the property qualifies for RainWise support.
The sequence matters. A garden that looks correct at installation can still fail if the bottom is oversized, the soil is compacted, or the overflow route is missing.
1. Site assessment and sizing: determine the footprint before buying plants
The first calculation is not the number of shrubs. It is the amount of impervious surface contributing runoff.
Measure the roof area, driveway, or other hard surface that will drain toward the garden. The bottom area of a Seattle rain garden is typically sized at 10% to 20% of that contributing area. Fifteen percent is a practical starting ratio.
For example, a roof section draining 600 square feet toward the garden produces a target bottom area of approximately 90 square feet at the 15% ratio. That could be a 6-by-15-foot rectangle, an 8-by-11-foot bed, or another shape that fits the site. The geometry can change. The drainage volume does not.
The contributing area should be calculated by drainage path, not by the total roof footprint. A downspout serving only the rear roof plane should not be assigned the runoff from the entire house. This distinction prevents two common errors:
- An undersized garden receives more water than its soil profile can process.
- An oversized garden consumes usable yard area without improving performance proportionally.
Location constraints
The garden must sit away from the foundation. Seattle guidance sets a minimum setback of 5 feet from a building foundation when there is no basement. The minimum increases to 10 feet for a building with a basement. If the basement extends more than 5 feet below grade, add 2 feet of setback for every additional foot of depth.
This is not a visual preference. It is a risk-control measure. A rain garden should intercept runoff before it reaches the building, not concentrate water beside the foundation wall.
Do not place the garden where it will interfere with:
- Underground utility lines.
- Septic infrastructure.
- Existing drainage pipes.
- Mature tree root systems.
- Driveway access or required pedestrian paths.
- A slope that directs overflow toward a structure or neighboring property.
The site also needs a reliable inflow route. A downspout can discharge through a solid pipe, a surface swale, or another controlled connection. The final design should identify the point where water enters, the area where it ponds, and the route used when the garden reaches capacity.
A rain garden is correctly sized only when the runoff source, soil capacity, foundation setback, and overflow route are evaluated as one system.
Slope and infiltration
Flat or gently sloping sites are the most predictable. For curbside rain gardens in Seattle planting strips, the street slope must be less than 5%, the planting strip must be at least 5 feet wide, and the soil must infiltrate water at a rate of at least 0.3 inches per hour.
A steep site changes the engineering problem. Water accelerates across the surface, erosion risk rises, and the garden may require terracing, check structures, or professional design. A standard shallow depression is not a universal solution for a steep yard.
A basic infiltration test provides useful early data. Dig a test hole in the proposed garden area, fill it with water, and observe the drainage rate after the surrounding soil has been wetted. One informal test does not replace site-specific design, but it can expose a serious limitation: compacted or clay-heavy ground that drains too slowly for a conventional installation.
The garden should not retain standing water indefinitely. In a properly constructed rain garden, ponded water should drain completely within 48 hours. Longer retention increases the risk of mosquito breeding, root damage, and anaerobic soil conditions.
A practical sizing sequence
Use this order rather than starting with a landscape plan:
1. Map the runoff source. Identify each downspout and hard surface that can be redirected.
2. Calculate the contributing area. Separate roof planes if they drain independently.
3. Apply the sizing ratio. Begin with 10% to 20% of the impervious area, using 15% as the standard working estimate.
4. Test the soil. Confirm that infiltration is compatible with the proposed depth and drainage time.
5. Confirm setbacks. Measure from the foundation, basement wall, utilities, and property boundaries.
6. Mark the overflow path. Water must have a safe route during a storm larger than the garden was designed to hold.
This process produces a footprint before materials are purchased. That reduces rework and limits the temptation to build the garden around whichever plants look best at the nursery.
2. Excavation and soil engineering: build the drainage layer, not just a hole
The visible feature is a planted depression. The functional feature is the soil profile below it.
Typical rain garden excavation in Seattle ranges from 18 to 30 inches. The final depth depends on the existing soil, the target ponding depth, the available grade, and the required separation from structures and utilities. Excavation should create a broad, shallow basin rather than a deep pit with abrupt sides.
The removed soil should not be piled along the edge where it can redirect runoff toward a foundation. On sloped sites, excavated material may be used to form a low berm on the downhill side, but the berm must be stable and integrated with the overflow design.
The bioretention soil mix
The engineered soil, often called bioretention soil, typically uses:
- 60% to 65% aggregate, generally sand.
- 35% to 40% organic compost.
The target depth is commonly 18 to 30 inches. The mix must be free-draining but capable of supporting plant roots. Excessive organic content can release nutrients into runoff. Poorly graded sand can compact or drain too rapidly. Manure-based or mushroom compost is not a substitute for the recommended plant-waste compost.
The soil should be placed without heavy equipment driving across the finished infiltration area. Compaction is one of the fastest ways to reduce performance. A rain garden can have an attractive planting plan and still function as a water bowl if the soil profile is compressed.
The subgrade should be prepared according to the site design. In some conditions, the existing soil is scarified to improve the transition between native soil and imported bioretention soil. In others, additional drainage measures may be required. The correct choice depends on infiltration testing and the intended runoff volume.
Inflow and overflow
Water must enter the garden without eroding the soil. Downspout outlets should discharge into a protected inlet area. Flat stones, cobbles, or other stable materials can reduce the velocity of concentrated flow. The inflow point should remain visible during early maintenance so blockages can be identified.
The overflow should be set at a controlled elevation. Once the basin fills to that level, excess water should leave through a protected route that does not cross a foundation or undermine a walkway. A poorly placed overflow converts a drainage improvement into a new drainage problem.
The design should answer four operational questions:
- Where does water enter?
- Where does the first flush collect?
- At what level does overflow begin?
- Where does overflow travel afterward?
If these answers are unclear, the garden is not finished.
Mulch and surface finish
A 2- to 3-inch mulch layer reduces evaporation, limits weed establishment, and protects the soil surface from direct rainfall. Material selection changes by zone. Compost can be used in the bottom area, while arborist wood chips are appropriate for the sides and upper edge.
Avoid creating a mulch layer so deep that it buries plant crowns or blocks the inlet. Mulch should not be used to hide poor grading. Water must still enter the basin and move across the intended surface.
The finished garden should have a visible shallow basin, stable edges, protected inflow, and an overflow point that can be inspected. The objective is not to make the drainage mechanics disappear. It is to integrate them into a landscape that remains legible and maintainable.
3. Strategic planting zones: match the plants to the hydrograph
Seattle rain gardens experience two different seasons. Winter brings saturation and repeated storm events. Summer brings extended dry periods. Plant selection must tolerate both conditions, not just the conditions present on installation day.
The planting plan should be divided into three zones. Each zone represents a different moisture regime.
Zone 1: the bottom
The flat bottom is the wettest area. It may hold shallow water temporarily during storms, then dry through the summer. Plants here must tolerate seasonal saturation and drought between rain events.
Suitable examples include:
- Slough sedge.
- Red-osier dogwood.
Spacing should allow mature plants to cover the soil without creating a dense obstruction at the inlet or overflow. The bottom is also the area most likely to collect sediment and leaf debris, so plants should be positioned to preserve access.
Zone 2: the side slopes
The side slopes experience occasional saturation but drain faster than the bottom. They require plants that tolerate wet periods while also managing summer dryness.
Examples include:
- Sword fern.
- Snowberry.
The slope should be planted densely enough to resist erosion. Bare soil on the sides is a temporary condition at best. Concentrated runoff can cut channels through an unprotected slope before the root systems establish.
Zone 3: the upper edge
The top edge receives less direct ponding. It behaves more like a standard landscape bed, particularly after the first wet season. Plants here should tolerate dry summers and should not require constant irrigation once established.
Examples include:
- Salal.
- Kinnikinnick.
This upper zone is also the visual transition between the rain garden and the rest of the yard. It can carry much of the curb appeal improvement Seattle homeowners seek without compromising the drainage function below.
Planting density and establishment
The first one to three years require active watering. Newly installed plants do not have the root volume to manage Seattle’s summer dry period. Watering should be deep and targeted, not frequent surface sprinkling that encourages shallow roots.
Planting density affects both performance and maintenance. A sparse installation exposes soil to weeds and erosion. An overcrowded installation creates competition, obstructs inspection, and may reduce air circulation. Use mature plant dimensions rather than the size of the nursery container when determining spacing.
A functional planting palette typically combines:
- Sedges or moisture-tolerant perennials in the bottom.
- Ferns, shrubs, and groundcovers on the slopes.
- Drought-tolerant evergreen or low-growing species at the edge.
- Plants with seasonal variation that make changes in water level visible.
Avoid selecting species solely because they are native or visually compatible. The relevant question is whether each plant matches the moisture and exposure conditions of its zone. Native plants often provide a strong starting point for rain garden plants in King County, but “native” does not mean “suitable for every position.”
The landscape-design tradeoff
A rain garden is not required to look like a utility trench. It can support a coherent residential landscaping plan with repeated plant forms, defined edges, and a controlled relationship to paths and patios. The constraint is functional: decorative elements cannot block the inlet, reduce the basin volume, or redirect overflow.
The most effective designs make the water-management logic visible through grading and planting. The lower zone reads as the drainage basin. The side slopes hold the structure. The upper edge connects the garden to the yard.
That is a better long-term result than disguising the depression with a flat planting bed that cannot retain or filter runoff.
4. Maintenance: preserve infiltration, not just appearance
Maintenance is modest compared with a conventional water feature, but it is not optional. A rain garden is a living filtration system. Plants, mulch, soil, and inlets all change over time.
The maintenance workload is highest during establishment and after major storms.
First year
During the first year, monitor the garden after significant rainfall and during dry weather. Look for:
- Erosion at the inflow point.
- Exposed roots or displaced mulch.
- Sediment blocking the inlet.
- Standing water that remains beyond 48 hours.
- Drying or failing plants.
- Overflow leaving the intended route.
Water new plants during dry periods. Remove weeds before they develop deep roots or produce seed. Replace dead plants with species suited to the same zone rather than moving plants indiscriminately between the bottom and upper edge.
Years two and three
The second and third years are the transition period. Root systems expand, canopy cover increases, and irrigation demand should decline. Continue checking the garden during summer. Seattle’s wet climate does not eliminate drought stress in established landscapes; it concentrates water in winter and creates a long dry interval in summer.
Annual mulching is typically sufficient. Maintain a 2- to 3-inch layer, keeping mulch away from stems and crowns. Add material only after removing excessive buildup. A thick layer can reduce infiltration at the surface and bury low-growing plants.
Mature maintenance
Once established, a rain garden generally needs:
- Seasonal weeding.
- Inspection and clearing of the inlet.
- Inspection of the overflow structure.
- Replacement or redistribution of mulch.
- Pruning where growth blocks paths or drainage features.
- Replanting after winter damage or prolonged summer stress.
- Removal of accumulated sediment where it reduces basin capacity.
Do not automatically remove every leaf. Organic material can support soil structure and habitat, but large accumulations at the inlet or in the basin can restrict flow. Maintenance should protect hydraulic capacity rather than enforce a sterile appearance.
The decisive performance test is drainage time. If water remains for more than 48 hours after a typical storm, investigate before adding more plants. Possible causes include surface clogging, compacted soil, an undersized overflow, sediment accumulation, or a design that receives more runoff than its footprint can process.
The maintenance standard is hydraulic, not cosmetic: the garden must accept runoff, drain within the intended window, and keep the overflow route open.
RainWise rebates and project economics
Seattle’s RainWise program is a partnership between Seattle Public Utilities and the King County Wastewater Treatment Division. For eligible properties, rebates can cover up to 100% of installation costs. The property must manage runoff from at least 400 square feet of roof area.
The qualification threshold is specific. Not every Seattle property is eligible, and eligibility is limited to designated basins or neighborhoods. A homeowner should confirm location and program requirements before treating the rebate as part of the project budget.
The financial sequence should be conservative:
1. Verify geographic eligibility.
2. Confirm that the roof area meets the 400-square-foot runoff threshold.
3. Establish the drainage concept and site setbacks.
4. Obtain the required program information or contractor assessment.
5. Separate eligible installation costs from unrelated landscape upgrades.
6. Budget for ongoing watering, weeding, mulch, and plant replacement.
A rebate can change the yield of the project, but it does not remove design constraints. An installation that fails to manage runoff, violates setbacks, or lacks a safe overflow path remains a defective drainage project regardless of its funding source.
For property transformations, the resale benefit is also narrower than a generic remodeling return-on-investment calculation. A rain garden may improve curb appeal, reduce visible drainage problems, and demonstrate a considered approach to stormwater. It does not automatically generate a measurable price premium. The strongest case is functional: the landscape performs a job while remaining integrated with the property.
How a rain garden fits into a Seattle property transformation
Rain gardens work best when included in a broader exterior plan rather than added as an isolated excavation. The surrounding improvements should support water movement.
A coordinated project might include:
- Redirecting downspouts away from the foundation.
- Regrading a small lawn area toward the basin.
- Replacing compacted turf with permeable planting zones.
- Defining the garden edge with stone or a low retaining detail.
- Repairing a muddy path with permeable surfacing.
- Using evergreen plants at the upper edge for winter structure.
- Keeping sightlines clear from the sidewalk and driveway.
The sequence should begin with drainage, then move to hardscape and planting. Installing a new path before confirming overflow can force water into the path base. Adding topsoil across the yard can seal the surface and reduce the garden’s infiltration rate. A planting bed placed over an existing utility line can create access problems later.
The project should also distinguish between visible and invisible value. A finished basin, healthy plants, and clean edges are visible. Correct soil composition, infiltration rate, and overflow protection are not. The invisible components determine whether the landscape continues to work after the first winter.
A four-step implementation schedule
A realistic installation can be organized into four phases.
Phase one: site verification
Complete measurements, soil testing, utility location, foundation setbacks, and runoff mapping. Confirm whether the proposed area meets the slope and width requirements if the garden is located in a planting strip.
Phase two: design and excavation
Set the basin footprint, excavation depth, inlet, overflow, and soil profile. Protect the subgrade from compaction. Place and grade the bioretention soil at the specified ratio.
Phase three: planting and surface protection
Install plants by moisture zone. Protect the inflow area from erosion. Apply the mulch layer without covering crowns or obstructing drainage features.
Phase four: observation and correction
Inspect the first several storms. Confirm that runoff enters the basin, spreads across the bottom, infiltrates, and exits through the planned overflow only when required. Correct erosion, settling, blocked inlets, or dead planting before those defects become structural.
This schedule is more reliable than treating the work as a single landscaping day. The garden’s behavior during storms is part of commissioning.
The market conclusion
Seattle rain garden landscaping has a binary outcome.
If the site is correctly sized, excavated to an appropriate depth, filled with a functional bioretention mix, planted by moisture zone, and maintained through establishment, it becomes a durable drainage asset. It can reduce nuisance runoff while improving the property’s exterior presentation.
If the project is treated as a shallow flower bed, the likely result is different: standing water, compacted soil, blocked overflow, plant loss, and a new maintenance liability.
The decision is therefore not whether a rain garden looks appropriate. The decision is whether the property has a manageable runoff source, a compliant location, sufficient infiltration, and an owner prepared to maintain the system for its first three years. If those conditions are present, proceed with a measured four-step plan. If they are not, use another Seattle yard drainage solution rather than forcing a rain garden into a site that cannot support one.